banner sun
                                                           Modifiers                                                           
  Overview   Density   Velocity  Squeeze   3D Module
 
       
frame icon Density modifier  
 

The density modifier sets the spatial distribution of density.

As all modifiers, the properties panel of the density modifier contains a textfield where you can identify this particular modifier with an identifying Name label. It is also displayed in the modifier stack.

Below the name, there is a switch to enable/disable the modifier without deleting it.

The density d is proportional to the f0 parameter and the magnitude, i.e. d = f0 * magnitude.

The magnitude is defined as a function of 3D position in the modifier graph that opens when you click on the Edit button (see below).

Within each modifier, the distribution is separable in its coordinates. That means that the magnitude is given as the product of the distribution in each coordinate. For instance, in cartesian coordinates you have

d(x,y,z) = f0 * mag_x (x) * mag_y (y) * mag_z (z)


density  modifier

More than one density modifier can be used in the modifier stack. You can combine them using the Operation drop-down selector, which includes operators of Replace, Add and Scale. This allows very complex distributions to be constructed, especially since different coordinate systems can be combined.

The Replace operator overwrites any density modifiers above it in the modifier stack and is combined only with density modifiers below.

The Add, of course, adds the density to any previous density modifiers.

The Scale operator multiplies the previous densities by this modifier. Note that this does not only mean the application of the current f0 multiplier, but the complete density modifier including the spatial dependence given by the modifier graph.

density modifier graph

How to preview the density distribution:
You can preview the density distribution in the 3D Module by deselecting the object or deactivating the Show Status button in the Object Properties Panel. See the animated illustration below.

density preview animation

RENDERER DEPENDENT USAGE:
For all but the Transfer renderer, the density distribution is equivalent to the emissivity distribution. For some physical processes emissivity is proportional to density, but for others it is basically proportional to the square of the density. In the latter case, you can make an instanced copy of the original density modifier and use the scale setting, This will multiply the two modifier and this effectively produce a the square of the density as the final distribution. This allows you to model density square emissivity distributions.


Texture editor:

Textures locally change the density distribution using a texture pattern. Currently, in Shape you can apply a Perlin noise texture to generate random patchy and filamentary structure.

To add a texture click on the Edit button near the Textures label at the bottom of the Density Modifier panel. A separate dialog opens which allows you to add textures and change their parameters. You can combine several textures to achieve the appropriate effect.

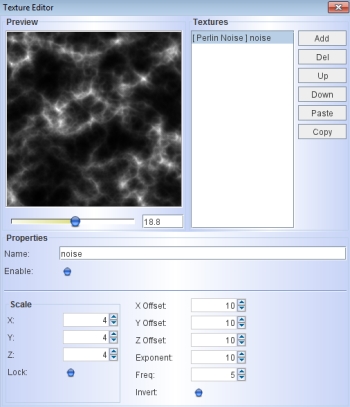
The texture editor has the usual control button to add, del, move, copy and paste. Then there is a stack with the textures that are multiplied together before they are applied. On the left, there is a preview window, which shows approximately the scale of the noise pattern as it will be in the rendered view. The slider at the bottom allows you to move through the direction perpendicular to the image plane.

Note that the pattern is applied in coordinates of world space. Meaning that it will not grow with an object that grows in time (as animated in the Animation Module). The surface of an expanding nebula will run through this pattern. An expanding pattern requires surface mapping, which is currently not implemented.

At the bottom of the texture editor you can set the scale of the noise pattern, as well as an offset in space. By default the scale in x, y and z directions are set equal. To make elongated filaments disable the Lock button and make the scales different to the required extend.

The Exponent controls the density contrast between the high and low values of the density pattern. For sparse filaments you need values of order 10.

The complexity of the pattern is controlled by the Frequency parameter.

To invert the dark and bright regions change the setting of the Invert button.

texture editor


  frame icon 16-Jun-2010  
Top