III. A basic observation with
PUMA
Before the run, check the different connexions showed
in fig. II.3.1.
The CS100 with PUMA.
The FP with the CS100 controller.
The Sun station ESTOPA with PUMA.
The connexion to the power of PUMA and CS100.
The dry Nitrogen with the FP.
Then to put the power on, you may:
- Check that the red switch on the rack (see fig. II.3.1)
is on.
When it is PUMA is moving the filter wheel to the position
0, the calibration lamps wheel to the first lamp and put the FP out
the optical path.
III.1
Observation strategy
A basic observation with PUMA is mainly composed of 2 parts:
the calibration lamp acquisition and the object acquisition itself the object acquisition itself. The
calibration is crucial to give the wavelength origin building the phase
map. From the quality of this phase map it will depend the quality of the
observations. Of course due to the fact that PUMA is using a CCD detector,
it is necessary to go through the standard procedure of bias and flat fields.
The flat field should be done for each filter used during the night.
III.2
A session PUMA
III.2.1
Description
The acquisition system is operating through an Xwin environment.
From the Linux PC ALPHA in the account observa (login: observa
password: xxxxx), you click on the icon "Puma",
it
appears the main dialog window (Figure III.2.1.1) and a small window
where you have to write the number of your session like this: p###, where
### is the number of the current observation, then return (Figure III.2.1.1bis).
It will also create a sub directory p###, in /home/observa/puma/work where
will be saved your observations.
When you are a PUMA session you have to save the parameters
first by clicking "escribir el archivo de parametros" even if you did fill
out the file.
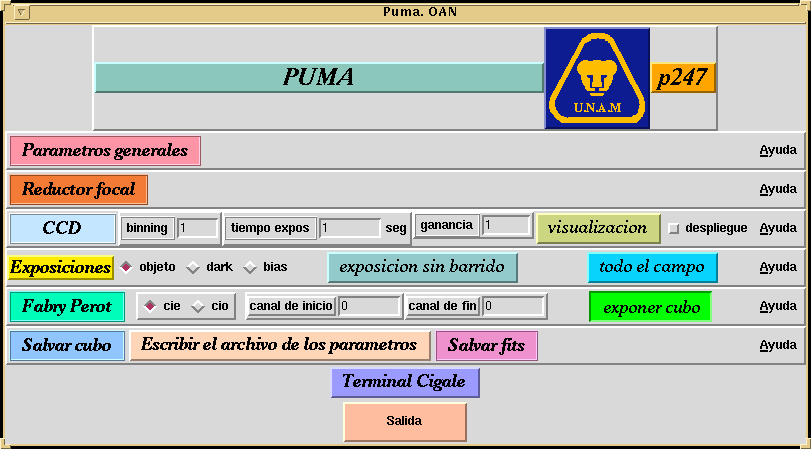
Figure III.2.1.1
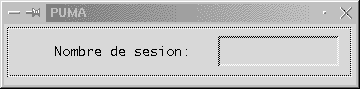
Figure III.2.1.1bis
From the panel showed in Figure III.2.1.1 you can control
everything, we are going to detail the different options:
 |
-
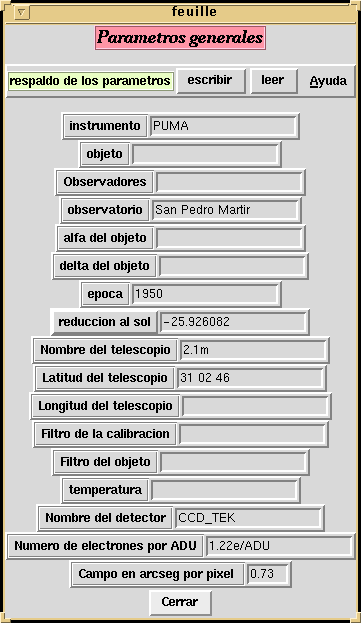
 Parametros generales
:
With
this option you will fill up the general parameters of your observation.
The figure III.3.1.2 shows the window. Parametros generales
:
With
this option you will fill up the general parameters of your observation.
The figure III.3.1.2 shows the window.
By clicking "escribir"
you can write parameters on
a file cip###. |
|
Figure III.2.1.2
|
|
|
|
 |
-
 reductor focal
: This option give you access to all the mobil parts of PUMA. There are
4 sections: "Espejo", "lamparas", "filtros", "Etalon". See
figure III.3.1.3. reductor focal
: This option give you access to all the mobil parts of PUMA. There are
4 sections: "Espejo", "lamparas", "filtros", "Etalon". See
figure III.3.1.3.
-
Espejo : by clicking on "Adentro"
or "Fuera" you will put the mirror in or out of the light
path.
-
lamparas : here you will control the calibration
lamp. It is wise to click on "inicializa" to do a reset before
moving the lamp wheel. You can choose between Neon, Helium or Hydrogen
lamps. You will switch the lamps on or off by clicking on "Apaga"
and "Enciende".
-
filtros : this section allows you to
change the position filter. Here too it is good to do a reset with "inicializa".
Etalon : You can remove or put the FP in
the light path by click on "Adentro" or "Fuera".
"Configuracion" allows you to configure the FP for a calibration
or an observation. "Barrido del Etalon" initiates the scanning
of the FP and "Reset" is doing a reset of the CS100.
|
|
Figure III.2.1.3
|
|
 |
-
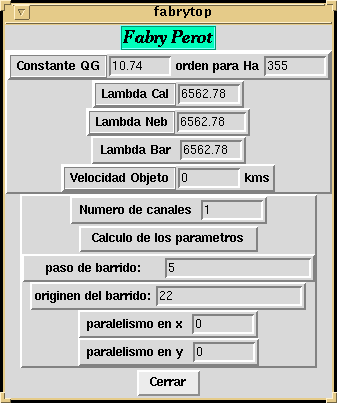
 Fabry Perot
: This option allows you to fill FP parameters. The QG constant is 10.74
and the order at Ha is 355. Those 2 parameters should not
be modified. You may after put the different wavelength: Calibration wavelength,
Nebula wavelength, the wavelength you want to scan and the systemic velocity
of your object. You may specifiy the number of channel you want to
scan (Numeros de canales) and then click on "Calculo
de los parametros". See Figure III.3.1.4. Fabry Perot
: This option allows you to fill FP parameters. The QG constant is 10.74
and the order at Ha is 355. Those 2 parameters should not
be modified. You may after put the different wavelength: Calibration wavelength,
Nebula wavelength, the wavelength you want to scan and the systemic velocity
of your object. You may specifiy the number of channel you want to
scan (Numeros de canales) and then click on "Calculo
de los parametros". See Figure III.3.1.4.
|
|
Figure III.2.1.4.
|
|
 |
-
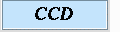 CCD
: From this window you have the control on CCD parameters. You can choose
the binning you want, the field you want to use: all of it or binning you want, the field you want to use: all of it or just a part
of it. See Figure III.3.1.5. CCD
: From this window you have the control on CCD parameters. You can choose
the binning you want, the field you want to use: all of it or binning you want, the field you want to use: all of it or just a part
of it. See Figure III.3.1.5.
-
For a calibration cube (cie) the gain (ganancia)
should be 1 and the time exposure 0.1s. For a science cube (cio)
the gain could be 1 or 2.
|
|
Figure III.2.1.5.
|
|
|
-
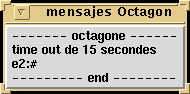
The Octagon window is showing all orders than you are giving
to PUMA and the answers. If the message "time out" appears, repeat the
operation.
|
| Figure III.2.1.6 |
|
III.2.2
Parallelism of the FP
To observe it is necessary to ensure that the 2 plates of
the interferometer are perfectly parallel. This proceduinterferometer are perfectly parallel. This procedure is done trough
the CS100 controller. The procedure of parallelization of the FP plates
should be done by the technical staff or the resident astronomer present
just before the observing run.
Some typical values of the CS100 controller are given
in Tables III.2.2.1.and III.2.2.2. The final tuning of the parallelism
will be done from the control room trough PUMA Xwin dialog box.
| |
Fine
|
Coarse
|
Balance
|
|
X
|
4.50
|
-0.2
|
4.04
|
|
Y
|
4.50
|
0.0
|
4.58
|
|
Z
|
1.94
|
3
|
3
|
3.88
|
|
|
|
Gain
|
Time Ct
|
|
X
|
32
|
25ms
|
|
Y
|
32
|
25ms
|
|
Z
|
32
|
25ms
|
|
|
Table III.2.2.1
|
Table III.2.2.2 |
NOTE: When the humidity is larger than 90%, the servostabilized
control could not work in order to hold the parallelism. DO NOT USE THE
INTERFEROMETER UNDER THIS CIRCUMSTANCE.
III.3
Visualisation with CIGALE
To visualizisation with CIGALE
To visualize an image, you have to run the window  "CIGALE" from the main PUMA window. It then will appear an
Xterm terminal where you can run the different command of CIGALE reduction
package. With civis you can visualize a cube, or a channel. Figure
III.3 shows an example. Writing the command civis cie (or cio),
you will be able to visualize the observation currentlly in the memory
of ALPHA. Writing civis ciep###, you will visualize any cube you
previoully saved in Cigale format.
"CIGALE" from the main PUMA window. It then will appear an
Xterm terminal where you can run the different command of CIGALE reduction
package. With civis you can visualize a cube, or a channel. Figure
III.3 shows an example. Writing the command civis cie (or cio),
you will be able to visualize the observation currentlly in the memory
of ALPHA. Writing civis ciep###, you will visualize any cube you
previoully saved in Cigale format.
By clicking on the image loaded after writing a civis
command with the mouse left button, you change the low cut and the high
cut
of the image with the minimum and the maximum on the
pixel you clicked. With the up and down arrows you can change the
cuts. With the left and right arrows you increase or
decrease the channel number.
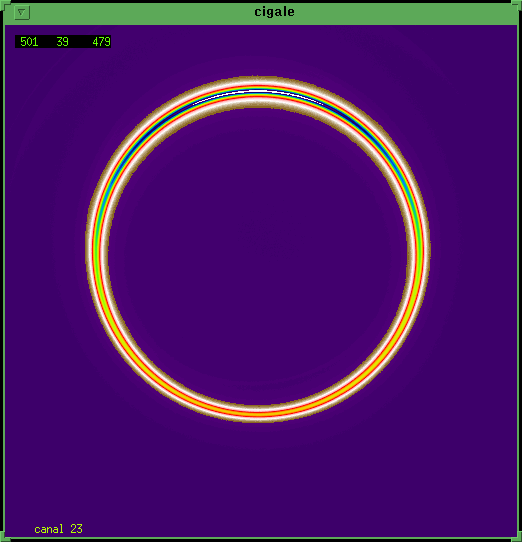 |
-
With civis ze=+1>With civis ciepXXX you can visualize a cube
like shown in figure III.3. This figure is showing an example of calibration
ring.
|
| Figure III.3 |
|
III.4
Running an observation
Once the technical staff has set the parallelism, you may
begin the observation. You first should focus of the telescope and center
the field of PUMA.
-
Center:
It is wise to have a coincidence between the center of
guiding and the center on PUMA field.
To do this, find a star with the guiding system, more
or less in the center of the guiding monitor. Then
do an exposure, with the Etalon, to see where the star
is on PUMA field. Then with the telescope motion control PC, do an offset
of the telescope in order to get the star on the center of PUMA field.
-
Focus:
Introduce the Etalon
Center a star (with a magnitude of 6)
On the CCD window manager
&nbsnbsp;
Define on the CCD a window of 120 x 120 pixels with a binning of 1
Use the option "mouse"
On the Etalon window manager
Choose like 5 channels to scan
Select a value for the focus
Do an exposition using "exposicion sin barrido"
Go to another value of the focus and then click on the
left button of the mouse.
Repeat this operations till the last channel.
Write the command "civis curseur" on the window
Cigale
Place the cursor on the star and click the central button
on the cigale window
The value of star diameter appears as "elarg"
Before doing the observation, verify the general parameters,
the focal reducer parameters, the FP parameters and the CCD parameters.
You may font size=+1>You may begin by doing a calibration exposition. To do
this, move the mirror in (espejo adentro), choose the
desired calibration lamp and switch it on. Then choose the time exposure.
Click on "cie" on the main PUMA window and put the first
channel: 0 and the last one: 47. Click "exponer cubo" to
begin the exposition.
Once you have completed the cube observation, you must save it in cigale
format or/and FITS format.
In Cigale format, you click on "Salvar cubo", the name will be ciep###.1
(or ciop###.1), ciep###.2 (or ciop###.2)
etc if you have several cubes of the same observation.
sp;
In FITS format, you click on the button " Salvar FITS" and you give the
name of the cube .fits.
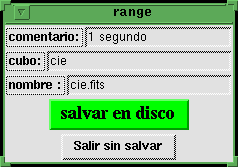 |
-
IMPORTANT: at the end of the scan, you have to save the data
cube clicking on "Salvar cubo", the program DOES NOT SAVE
OBSERVATION AUTOMATICALLY. You can save either your files in FITS or cigale
format. See figure III.4.1
|
|
Figure III.4.1
|
|
Usually it is wise to do 2 calibration exposures, one
before the science exposition and the other after in order to check eventual
shifts on FP settings. But due to the long time taken for an exposition
(exposition itself, CCD reading, images transfer to ALPHA...) and the great
number of channels to be done (48), only 1 calibration exposition could
be made (before or after the science observation).
The procedure for a science exposition is the same, except
that you may change integration time and select "cio" on
the main PUMA window.
A complete package of data reduction has been
developed by J.
Boulesteix from Marseilles Observatory (France).
ADHOC
package
can be transfer from the web.
You will find a log sheet of PUMA observation here
.